


Starting marigold seeds indoors is straightforward and rewarding. This method ensures healthy plants ready for outdoor life.
Marigolds are vibrant flowers known for their bright colors and easy maintenance. They thrive in various conditions, making them ideal for beginners. By starting seeds indoors, you control the growing environment. This approach provides a head start, especially in unpredictable climates.
It allows you to monitor growth from the very beginning, ensuring strong, healthy plants. Indoor seed starting also extends the blooming season. With a few simple steps, you can create the perfect conditions for marigold seedlings. This guide will walk you through the process. Soon, your home will be filled with the promise of beautiful blooms. Let’s dive into the world of marigold gardening.
Choosing The Right Seeds
Starting marigold seeds indoors can be an exciting and rewarding experience. One crucial step in this process is choosing the right seeds. The seeds you select will greatly impact the success of your indoor gardening adventure. Let’s explore the types of marigold seeds and the seed quality considerations to ensure you make the best choices.
Types Of Marigold Seeds
There are several types of marigold seeds available, each with unique characteristics. Understanding these types can help you decide which variety suits your indoor garden.
French Marigolds:
- Size: Compact, usually growing up to 12 inches tall.
- Flower Colors: Orange, yellow, and red.
- Bloom Time: Early summer to late fall.
African Marigolds:
- Size: Taller, reaching up to 36 inches.
- Flower Colors: Mainly yellow and orange.
- Bloom Time: Early summer to frost.
Signet Marigolds:
- Size: Small, compact plants.
- Flower Colors: Yellow, orange, and red.
- Bloom Time: Summer to early fall.
Choosing between these types depends on your space and preference. For small indoor gardens, French and Signet marigolds are ideal. For larger areas, African marigolds can create a striking display. Understanding how to start marigold seeds indoors, how to start seeds indoors paper towel, and how to start zinnia seeds indoors will help you make informed decisions.
Table of Contents
Seed Quality Considerations
Seed quality is essential for successful indoor gardening. Here are some factors to consider:
- Freshness: Check the packaging date. Fresh seeds have higher germination rates.
- Purity: Ensure seeds are free from debris and other plant materials.
- Genetic Integrity: Choose seeds from reputable suppliers to ensure they are true to type.
- Storage: Properly stored seeds maintain their viability longer. Look for seeds kept in cool, dry conditions.
When selecting marigold seeds, consider these quality factors. Here is a table summarizing key considerations:
| Factor | Importance | Details |
|---|---|---|
| Freshness | High | Check packaging date |
| Purity | High | Free from debris |
| Genetic Integrity | Medium | Reputable suppliers |
| Storage | Medium | Cool, dry conditions |
Understanding these factors will help you choose the best seeds for starting marigold seeds indoors. Similar considerations apply when learning how to start watermelon seeds indoors, how to start sunflower seeds indoors, and how to start seeds indoors paper towel. Quality seeds will ensure healthy growth and beautiful blooms.
Gathering Supplies
Starting marigold seeds indoors is a fun and rewarding project. It allows you to get a head start on your gardening season. Before you begin, it’s important to gather all the supplies you’ll need for successful seed starting. Below, we will cover the essential tools and the soil and containers required to start your marigold seeds indoors effectively.
Essential Tools
Having the right tools is crucial for starting marigold seeds indoors. These tools help ensure that seeds germinate properly and seedlings grow strong. Below is a list of essential tools you will need:
- Seed trays: These are shallow containers that hold the soil and seeds.
- Seed starting mix: This lightweight soil mix is ideal for seed germination.
- Watering can or spray bottle: Use these to keep the soil moist without drowning the seeds.
- Heating mat: This provides consistent warmth to help seeds germinate.
- Grow lights: These provide the light necessary for seedlings to grow strong and healthy.
- Labels and markers: Use these to keep track of different seed varieties.
- Plastic wrap or a humidity dome: These help retain moisture and create a mini-greenhouse effect.
Each of these tools plays a key role in the seed starting process. The seed trays and seed starting mix provide a suitable environment for the seeds to grow. A watering can or spray bottle ensures the soil remains moist but not waterlogged. A heating mat helps maintain the optimal temperature for germination. Grow lights are essential if you don’t have enough natural light. Labels and markers keep your seedlings organized. Finally, plastic wrap or a humidity dome helps maintain the necessary humidity levels.
Soil And Containers
Choosing the right soil and containers is vital for starting marigold seeds indoors. Not all soils and containers are created equal. Below are some tips on selecting the best options:
- Seed starting mix: This mix is lighter and finer than regular potting soil. It provides good drainage and aeration, essential for seed germination. Avoid using garden soil as it may contain pests and diseases.
- Biodegradable pots: These pots can be planted directly into the garden. They reduce transplant shock and are environmentally friendly.
- Plastic seed trays: These trays are reusable and come with individual cells for each seed. They are easy to clean and store.
- Peat pots: Made from compressed peat moss, these pots are biodegradable. They are excellent for seeds that dislike root disturbance.
- Recycled containers: You can use yogurt cups, egg cartons, or other small containers. Just ensure they have drainage holes at the bottom.
Here is a table summarizing the advantages and disadvantages of different container types:
| Container Type | Advantages | Disadvantages |
|---|---|---|
| Biodegradable Pots | Eco-friendly, reduces transplant shock | Can degrade too quickly |
| Plastic Seed Trays | Reusable, durable | Not eco-friendly, requires cleaning |
| Peat Pots | Biodegradable, good for root-sensitive plants | Can dry out quickly |
| Recycled Containers | Cost-effective, eco-friendly | May need to add drainage holes |
By choosing the right soil and containers, you set a strong foundation for your marigold seedlings. This ensures they grow healthy and robust, ready to be transplanted into your garden. Whether learning how to start seeds indoors with a paper towel or how to start zinnia seeds indoors, the principles of using the right soil and containers remain the same.
Preparing The Soil
Starting marigold seeds indoors is a fantastic way to ensure healthy and vibrant flowers for your garden. One of the key steps in this process is preparing the soil. The right soil can make a significant difference in the growth and health of your marigold seedlings. Let’s explore how to prepare the soil effectively.
Soil Mix Recommendations
Choosing the right soil mix is crucial for starting marigold seeds indoors. Here are some recommendations to help you create the ideal environment for your seeds:
- Seed Starting Mix: Use a high-quality seed starting mix. These mixes are light and fluffy, allowing for good air circulation and root growth.
- Sterilized Soil: Ensure the soil is sterilized to prevent diseases and pests. You can purchase pre-sterilized soil or sterilize it yourself by baking it in the oven.
- pH Balance: Marigold seeds thrive in soil with a pH between 6.0 and 7.5. Test the soil and adjust the pH if necessary using lime or sulfur.
Here is a simple table to summarize the soil mix components:
| Component | Purpose |
|---|---|
| Seed Starting Mix | Light and fluffy texture for root growth |
| Sterilized Soil | Prevents diseases and pests |
| pH Balance (6.0 – 7.5) | Optimal growth conditions |
Using the right soil mix ensures your marigold seeds have the best start indoors. This method can also be applied to other seeds like zinnia, watermelon, and sunflower.
Moisture Levels
Maintaining appropriate moisture levels in the soil is essential for starting marigold seeds indoors. Too much or too little water can hinder germination and growth. Follow these tips to keep moisture levels just right:
- Consistent Moisture: Keep the soil consistently moist but not soggy. Overwatering can lead to root rot, while under-watering can prevent germination.
- Drainage: Ensure the containers have good drainage. Excess water should be able to escape to avoid waterlogging.
- Humidity: Use a humidity dome or plastic wrap to maintain humidity levels. This creates a micro-environment that helps seeds germinate.
Here’s a quick reference table for maintaining moisture levels:
| Tip | Description |
|---|---|
| Consistent Moisture | Keep soil moist, not soggy |
| Good Drainage | Ensure excess water can escape |
| Humidity Dome | Maintain high humidity for germination |
Proper moisture levels help marigold seeds germinate and grow strong. These principles also apply to other seeds like zinnia, watermelon, and sunflower.
Sowing Seeds
Starting marigold seeds indoors can be a fun and rewarding experience. This method allows you to get a jump start on the growing season and have healthy plants ready to transplant when the weather warms up. Sowing seeds properly is crucial for successful germination and growth. Let’s dive into the specifics of planting depth and spacing tips to ensure your marigold seeds thrive.
Planting Depth
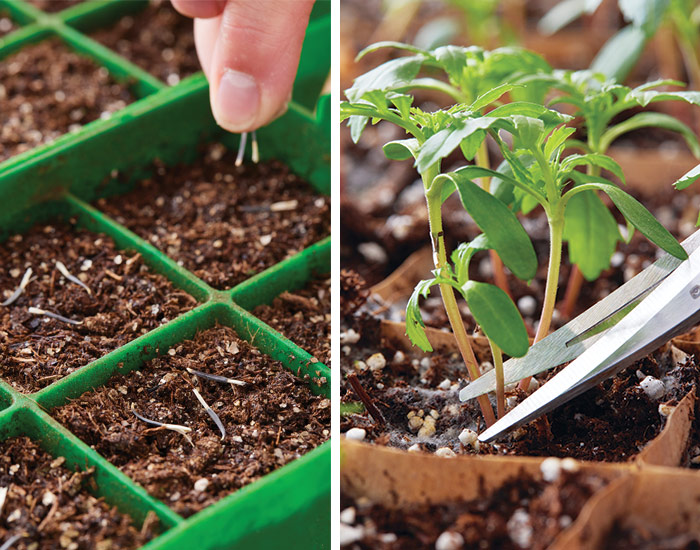
When it comes to sowing marigold seeds, the planting depth is an essential factor. Marigold seeds are small and require a shallow planting depth to germinate effectively. Here are some key points to consider:
- Shallow Planting: Marigold seeds should be planted just below the soil surface. A depth of about 1/4 inch is ideal.
- Lightly Cover: After placing the seeds on the soil, lightly cover them with a thin layer of soil or vermiculite. This helps maintain moisture and prevents the seeds from drying out.
- Gentle Watering: Use a spray bottle or a gentle watering can to moisten the soil. Avoid heavy watering as it can displace the seeds.
To ensure even planting depth, you can use a seed starting tray or small pots. Fill the containers with seed starting mix, gently press the seeds into the soil, and cover them lightly. Following these steps will help create the perfect environment for your marigold seeds to germinate.
Spacing Tips
Proper spacing is crucial for healthy marigold plants. Crowded seedlings can lead to weak growth and disease. Here’s how to space your seeds for optimal growth:
- Initial Sowing: When sowing marigold seeds indoors, place each seed about 1-2 inches apart. This allows each seedling enough room to grow without competing for resources.
- Thinning Seedlings: Once the seedlings have grown and developed a few true leaves, thin them out. Keep the healthiest plants and remove the weaker ones. Aim for a final spacing of 6-8 inches between each plant.
- Transplanting: When transplanting marigold seedlings outdoors, ensure they are spaced 8-12 inches apart. This gives them ample room to spread out and flourish.
By following these spacing tips, your marigold plants will have enough room to grow strong and healthy. This approach can also be applied to other seeds, such as how to start zinnia seeds indoors, how to start watermelon seeds indoors, and how to start sunflower seeds indoors. Proper spacing ensures that each plant has access to the nutrients and light it needs to thrive.
Creating The Ideal Environment
Starting marigold seeds indoors can be a rewarding and fun project. It ensures you have strong, healthy plants ready to bloom when the weather warms up. Creating the ideal environment for your marigold seeds is essential for their successful germination and growth. Let’s dive into the key aspects of setting up the perfect conditions, focusing on temperature and lighting.
Temperature Requirements
Marigold seeds need the right temperature to germinate successfully. To create the ideal environment, maintain a temperature range between 70°F and 75°F (21°C to 24°C). This is crucial for proper seed germination.
Here are some tips to achieve the perfect temperature:
- Use a seedling heat mat. Place it under the seed trays to maintain consistent warmth.
- Keep your seed trays in a warm room. Avoid placing them near windows or doors where drafts may cause temperature fluctuations.
- Monitor the temperature with a thermometer. Regular checks ensure it stays within the ideal range.
Temperature consistency is key. Sudden drops or spikes can hinder seed germination. For those curious about how to start seeds indoors with a paper towel method, maintaining this temperature range is equally important.
Below is a table summarizing the temperature requirements for various seeds:
| Seed Type | Ideal Temperature Range (°F) |
|---|---|
| Marigold | 70-75 |
| Zinnia | 70-75 |
| Watermelon | 75-85 |
| Sunflower | 70-78 |
Lighting Solutions
Light is another crucial factor in creating the ideal environment for marigold seeds. After germination, seedlings need plenty of light to grow strong and healthy. Insufficient light can lead to leggy, weak plants.
Consider these lighting solutions:
- Natural Light: Place seed trays in a south-facing window. Ensure they get 6-8 hours of sunlight daily.
- Grow Lights: If natural light is insufficient, use grow lights. Position them 2-3 inches above the seedlings.
- Adjustable Lights: Use adjustable grow lights. This allows you to maintain the correct distance as plants grow.
Grow lights are especially useful for those interested in how to start watermelon seeds indoors or how to start sunflower seeds indoors, as these plants also require strong light. Set a timer for 14-16 hours of light daily to mimic natural sunlight.
Here are some recommended grow lights:
- Fluorescent Lights: Affordable and efficient. Great for beginners.
- LED Grow Lights: Energy-efficient and long-lasting. Ideal for larger setups.
- Incandescent Lights: Less efficient but useful for small projects.
Proper lighting ensures healthy, vigorous growth. It is essential for anyone learning how to start zinnia seeds indoors or other similar plants. Regularly rotate the trays to ensure even light distribution.
Maintaining optimal temperature and lighting will help you grow strong, healthy marigold seedlings ready for transplanting outdoors.
:max_bytes(150000):strip_icc()/how-to-plant-marigold-seeds-7371595_Hero1-d814c4e770a542f89d28e49ee3498956.jpg)
Watering Techniques
Starting marigold seeds indoors can be a rewarding experience. One of the most important aspects of how to start marigold seeds indoors is understanding proper watering techniques. Watering your seeds correctly ensures they grow strong and healthy. Let’s dive into some key watering techniques to get your marigold seeds off to a great start.
Frequency And Amount
Knowing how often and how much to water your marigold seeds is crucial. Overwatering or underwatering can harm their growth. Here are some tips to help you get it just right:
- Initial Watering: After planting the seeds, give them a good soak. The soil should be moist but not drenched.
- Daily Checks: Check the soil every day. The top layer should be moist. If it feels dry, it’s time to water.
- Light Watering: Use a spray bottle or a watering can with a fine nozzle. This prevents disturbing the seeds.
- Avoid Puddles: Ensure there are no puddles on the soil surface. This can lead to seed rot.
Here’s a simple table to guide your watering schedule:
| Stage | Watering Frequency | Amount |
|---|---|---|
| Initial Planting | Once | Thorough soaking |
| First Week | Daily | Light spray |
| Second Week Onwards | Every 2-3 days | Moderate watering |
Signs Of Overwatering
Overwatering is a common mistake when learning how to start marigold seeds indoors. It can be harmful to your seeds. Here are some signs to watch out for:
- Yellowing Leaves: If the leaves turn yellow, it could be a sign of too much water.
- Mold Growth: Mold on the soil surface indicates excess moisture.
- Wilting: Oddly, overwatered plants can look wilted. This happens because the roots can’t get oxygen.
To avoid overwatering, follow these tips:
- Drainage: Ensure your pots have proper drainage holes. This allows excess water to escape.
- Soil Check: Use your finger to check the soil. If the top inch is dry, it’s time to water.
- Water Wisely: Water in the morning. This gives the soil time to dry out during the day.
By paying attention to these signs, you can ensure your marigold seeds grow healthy and strong. Proper watering is key in learning how to start seeds indoors paper towel method, how to start zinnia seeds indoors, and even how to start watermelon seeds indoors. Whether you’re growing marigolds or learning how to start sunflower seeds indoors, these techniques are essential.
Transplanting Seedlings
Starting marigold seeds indoors is a rewarding way to get a head start on your garden. Marigold seedlings require proper care before they are ready for transplanting. Transplanting seedlings is a crucial step to ensure they thrive once moved outdoors.
Timing For Transplant
Knowing the right time to transplant marigold seedlings is essential for their growth. Typically, marigolds are ready to be transplanted outdoors after 6-8 weeks of indoor growth. Here are some key signs that indicate readiness:
- True Leaves: Seedlings should have at least two sets of true leaves.
- Sturdy Stems: Stems should be firm and strong, not thin or weak.
- Healthy Roots: Roots should be visible and well-developed, but not root-bound.
To ensure your marigolds are ready for transplant, check the following conditions:
| Condition | Description |
|---|---|
| Temperature | Night temperatures consistently above 50°F (10°C). |
| Weather | Stable weather without late frosts. |
| Sunlight | Full sun exposure for at least 6 hours a day. |
Best Practices For Moving Outdoors
Moving marigold seedlings outdoors requires careful handling. Follow these best practices to ensure a smooth transition:
- Hardening Off: Gradually expose seedlings to outdoor conditions. Start with a few hours of sunlight and increase daily.
- Choosing the Right Spot: Select a location with full sun and well-drained soil. Avoid areas with heavy shade or waterlogging.
- Preparing the Soil: Prepare garden beds by loosening the soil and adding compost. This improves drainage and nutrient content.
- Transplanting: Plant seedlings at the same depth as they were in pots. Space them 8-12 inches apart to allow for growth.
Water the seedlings thoroughly after transplanting. Keep the soil moist but not waterlogged. Mulching around the plants helps retain moisture and control weeds.
Whether you are learning how to start seeds indoors paper towel method, or how to start zinnia seeds indoors, timing and best practices are vital for successful transplanting.
From how to start watermelon seeds indoors to how to start sunflower seeds indoors, the principles of transplanting remain similar. Focus on timing, location, and care for healthy plants.
Frequently Asked Questions
What Is The Fastest Way To Germinate Marigold Seeds?
To germinate marigold seeds quickly, soak them in warm water for a few hours. Plant seeds in moist, well-draining soil. Keep the soil consistently moist and place in a warm, sunny location. Seeds typically germinate within 5-7 days.
Should I Soak Marigold Seeds Before Planting?
No, you do not need to soak marigold seeds before planting. They germinate well without soaking. Simply plant them in well-draining soil and keep them moist.
Which Side Of Marigold Seed Goes Down?
Place marigold seeds with the pointed end down. This ensures proper root development and healthy growth.
When Should You Start Marigold Seeds Inside?
Start marigold seeds indoors 6-8 weeks before the last frost date. This ensures healthy seedlings for transplanting.
What Is The Best Time To Start Marigold Seeds Indoors?
Start marigold seeds indoors 6-8 weeks before the last frost date.
How Do You Prepare Soil For Marigold Seeds?
Use a seed-starting mix. Ensure the soil is light and well-draining.
How Deep Should Marigold Seeds Be Planted?
Plant marigold seeds 1/4 inch deep in the soil.
Conclusion
Starting marigold seeds indoors is easy and rewarding. Follow the steps above. You’ll soon see beautiful marigolds in your garden. Remember to keep the soil moist. Place the seeds in a warm, sunny spot. Watch for sprouts in a few days.
Transplant seedlings carefully when ready. Your garden will thank you with vibrant blooms. Enjoy your gardening journey and happy planting!